I want to build…
a web application, I will use .NET Core
a mobile Android application, I will use Xamarin.Android
a mobile iOS application, I will use Xamarin.iOS
I can do this because all the above frameworks and runtimes adhere to the .NET Standard
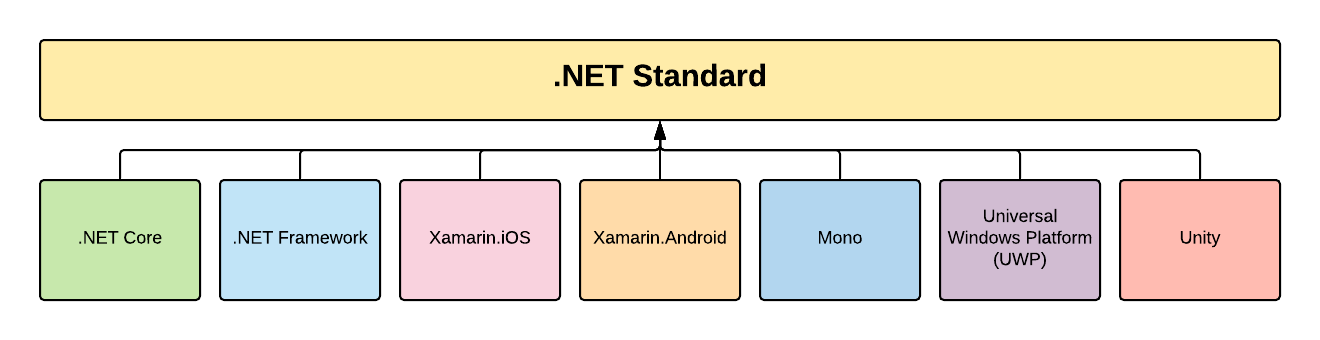
The .NET Standard is a unified collection of specifications that are tailored to have cross-platform implementations as described above. This allows us to use the same stack to develop for many different operating systems and devices.
Microsoft describes it as:
In short, it’s an ecosystem consisting of frameworks and tools that enable
developers to
- write some code
- compile it
- run it
…within a given runtime.
Supporting application development for:
- desktop
- web
- mobile
- gaming
- Internet of Things (IoT)
> It supports C#, F#, and Visual Basic
You can write applications in either of the three languages. It is also
possible to mix and match languages in the same codebase!
> It’s free!
It costs nothing to download the suite of tooling and runtime to build and
run .NET applications
The .NET runtime is supported on Windows, MacOS, Linux, and other operating systems and devices
> It’s open source
Source code for .NET system and tooling can be found in this Microsoft and .NET foundation
hosted GitHub organization
Here’s where you start.
.NET Core SDK and CLI
The first step is to download and install the .NET Core SDK. This is the development kit for .NET that will be the engine for your application.
If you’re familiar with Java, .NET Core SDK is similar to Oracle JDK, OpenJDK, or the other billion JDK variants.
On MacOS
The easiest way to obtain the SDK is to use Homebrew
In a terminal, run…
The .NET SDK contains within it the .NET CLI that we’ll use going forward.
To make sure it successfully installed and accessible, run…
You should receive an answer with a version number, such as 2.2.107 or later.
You’re on your way to conquering .NET!
To keep it really simple, .NET Core code is divided into two bundling strategies:
Projects and Solutions
A project is a set of bundled source code files.
A solution is a collection of projects and acts as a mediator between the projects it holds.
It is important to note that you keep your tests separate from your actual production code.
Here’s a visual example:

The SoAwesomeSolution is the main entity that holds the two source projects SoAwesome.API and SoAwesome.Core. It’s an example of a clean architecture convention as created by Ardalis.
The test project SoAwesome.Tests holds all the tests for all projects, but in real life or when needed, this could be broken down to individual test projects for each source project.
Let’s build a REST API.
As an example, we’ll build a weather service that will give us some real interesting facts about current weather conditions in the world.
.NET Core CLI has a concept of templates which we’ll be using to generate projects within a solution.
# Create a directory and navigate to it
mkdir dotnet-weather-station
cd dotnet-weather-station

# Make this directory our 'solution' with the name WeatherStation
dotnet new sln --name WeatherStation

# Let's take a look at the selection of templates .NET Core provides
dotnet new --list

# The closest option for our use case is the webapi option (shorthand)
# Create an API project using the webapi template
dotnet new webapi --output src/WeatherStation.API --name WeatherStation.API

# Clean up unnecessary auto-generated controllers
rm -rf src/WeatherStation.API/Controllers

# Create an accompanying test project using xUnit which will hold all the API test cases
dotnet new xunit --output tests/WeatherStation.API.Tests --name WeatherStation.API.Tests

# Clean up unnecessary auto-generated test cases
rm tests/WeatherStation.API.Tests/UnitTest1.cs

# Add the WeatherStation.API project reference to the test project
dotnet add tests/WeatherStation.API.Tests reference src/WeatherStation.API/WeatherStation.API.csproj

# Add the newly created API project and test API project to be part of the 'solution'
dotnet sln WeatherStation.sln add src/WeatherStation.API/WeatherStation.API.csproj
dotnet sln WeatherStation.sln add src/WeatherStation.API.Tests/WeatherStation.API.Tests.csproj
At this point, we can import the project into JetBrains Rider IDE by opening a solution that we have just
created.
The structure of our directory tree should look similar to below. Let’s take this opportunity to
describe what solution (.sln) and project (.csproj) do.

It’s important to note that all the projects in the tests directory are never packaged as part of the runtime executable.
Create the first controller
Within src/WeatherStation.API project, create a WeatherStationIntroController.cs file.
*.cs files are C# files. Here’s the contents for our first controller:
using Microsoft.AspNetCore.Mvc;

namespace WeatherStation.API
{
    [Route("/")]
    public class WeatherStationIntroController : ControllerBase
    {
        [HttpGet]
        public string WeatherStationIntroduction() => "This is the weather station.";
    }
}
Let’s take a moment to break down the contents of this first Controller class.

Run the API project locally
To start the REST API project locally, run…
dotnet run --project src/WeatherStation.API
You should see it bind to ports 5000 (http) and 5001 (https) by default.
Here’s an example log output
info: Microsoft.AspNetCore.DataProtection.KeyManagement.XmlKeyManager[0]
      User profile is available. Using 'C:\..\AppData\Local\ASP.NET\DataProtection-Keys'
      as key repository and Windows DPAPI to encrypt keys at rest.
Hosting environment: Development
Content root path: G:\workspace\dotnet-weather-station\src\WeatherStation.API
Now listening on: https://localhost:5001
Now listening on: http://localhost:5000
Application started. Press Ctrl+C to shut down.
Use Google Chrome browser to navigate to http://localhost:5000. It will redirect you to https://localhost:5001, proceed with accepting the risk of a self-signed certificate and you should see the output of the root route we described above.
What even is this .NET
Get the .NET Core SDK and CLI
Structure of Code
Creating a REST API with .NET Core
Downloads